GraphQL API Reference
You can use the Zeet GraphQL API to build integrations that extend and enhance Zeet features. This page will help you get started with using the GraphQL API.
You can use the links in the sidebar to learn more about how to use the schema:
- Allowed operations: queries, mutations and subscriptions.
- Schema-defined types: scalars, objects, enums, interfaces, unions, and input objects.
Getting Started
1. Installing GraphQL
First install GraphQL in your local development environment.
- JavaScript
- Python
npm add graphql-request graphql
pip3 install gql[all]
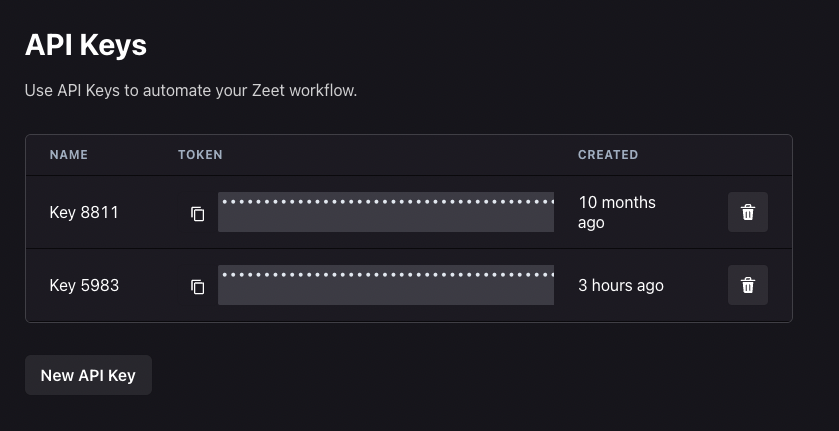
2. Generate your Zeet API Key
You can generate an API key for Zeet by going to https://zeet.co/account/api. You can also find this by going to Team Settings → API Keys. Once you are here, create a new API Key which you can use in your program as shown below.
Choosing the Right API Version
Zeet provides two versions of the GraphQL API: api v0 and api v1. Each version has its own endpoint:
- For
api v0, use:https://anchor.zeet.co/graphql - For
api v1, use:https://anchor.zeet.co/v1/graphql
The two API versions cater to different use cases and offering different entities and app types. Below is a comparison to help you choose the right API version for your needs.
API v1
Project Types:
- Terraform: An open-source Infrastructure as Code (IAC) tool allowing you to build, change, and version infrastructure efficiently.
- Helm: A Kubernetes package manager designed to define, install, and upgrade applications.
- Manifest: A Kubernetes manifest file that delineates the resources and configurations required for an application.
Entities:
- Project: A structured collection of settings and configurations necessary for deploying your application.
- Deploy: A configuration within a project that outlines how the infrastructure is deployed.
- Workflow: A sequenced series of steps undertaken to deploy your infrastructure.
Use Case:
- Geared towards Infrastructure as Code (IAC) Stack management, facilitating the management and provisioning of infrastructure defined through code.
API v0
Project Types:
- Service Container Allows you to build and deploy an application directly from a GitHub repository.
- Job Container Allows you to build and deploy an application directly from a GitHub repository.
- Serverless Function Facilitates deployment to Amazon AWS's serverless computing platform (AWS Lambda) and Google Cloud Platform's serverless computing platform (Google Cloud Run).
Entities:
- Repo: The Zeet entity responsible for tracking your application configuration.
- RepoBranch: Represents branched versions of your app, supporting preview environments.
- Deployment: Denotes the entity representing a deployment rollout of your app.
Use Case:
- Tailored for direct cloud and Kubernetes deployment, facilitating the process of deploying applications directly to Kubernetes or other cloud platforms.
3. Import package and setup endpoint
You are now ready to start sending API requests using GraphQL to Zeet! Let’s import the package in our file and set up our endpoint and authorization for Zeet.
- JavaScript
- Python
import { GraphQLClient, gql } from "graphql-request";

async function main() {
  // define your HTTP endpoint
  const endpoint = "https://anchor.zeet.co/v1/graphql";

  // create new GraphQLClient object
  const graphQLClient = new GraphQLClient(endpoint, {
    headers: {
      authorization: "Bearer " + API_KEY,
    },
  });
}
from gql import gql, Client
from gql.transport.aiohttp import AIOHTTPTransport

# Headers contains your authorization token for Zeet
# Note that you ahve to use the Authorization field and not the X-API-KEY
reqHeaders = {
  'Authorization': 'Bearer ' + API_KEY
}

# Define how the connection is made with backend (sync/async, http/websocket)
# Here, we are using Async IO HTTP Transport
_transport = AIOHTTPTransport (
  url = 'https://anchor.zeet.co/v1/graphql',
  headers = reqHeaders,
)

# Create new GraphQL Client object
client = Client (
  transport = _transport,
  fetch_schema_from_transport=True
)
4. Queries using GraphQL
You can test and make sure that your API actually works by sending a simple request to fetch you Zeet User ID.
- JavaScript
- Python
.
.
// create a new request
const req = gql`
    query {
        currentUser {
          id
        }
    }
`

// send the query as a request
const data = await graphQLClient.request(req);

// print the data received
console.log (JSON.stringify(data, undefined, 4));
.
.
# create a new GraphQL query
req = gql ("""
query {
        currentUser {
            id
        }
}
""")

# send the query as a request
result = await client.execute_async (req)

# print the data received
print (result)
5. Mutations using GraphQL
You can use Mutations to modify data in the data store. Note that Mutations always return some data. You can perform Mutations as easily as a query; when crafting your request, use the mutation keyword instead of query to specify a Mutation.
For example, if you wanted to update a project name, you could do so with the following Mutation:
mutation {
  updateProject(id: "my_project_id", input: { name: "new-name" }) {
    id
  }
}